Findings and Investigations
Isolate an event, interpret its identity/application/control/device context, decide whether behavior is expected, and document the response.
Navigation: Findings > Browser Extension or Findings > Endpoint Agent. Keep sources separate during first-pass triage.
Configuration and options: Use date range, search, status, finding type, data category, criticality, application, app status, group/department, action, and outcome where available.
Role-specific value: Administrators assess policy correctness and remediation ownership; Engineers validate evidence, related activity, versions, and false-positive hypotheses.
Verification: The disposition cites a finding ID and explains identity, application, control, event, outcome, device/client, data context, and next action.
Walkthrough
-
Choose the correct source and a date range that includes the event. Use Clear All when existing filters may hide it.
-
Search by user, application, logged-in account, or finding ID.
-
Open the matching card and compare time, identity, device, application, and control with the test or incident record.
-
Read Finding Status, category, Criticality, source, event, and Outcome independently. A high-risk model does not by itself prove malicious intent.
-
Review sensitive-data classification, client/version, and Related Findings. Look for repeated activity or inconsistent outcomes.
-
Use actions such as Change Status, Export, or an available agent workflow only under the incident-response process.
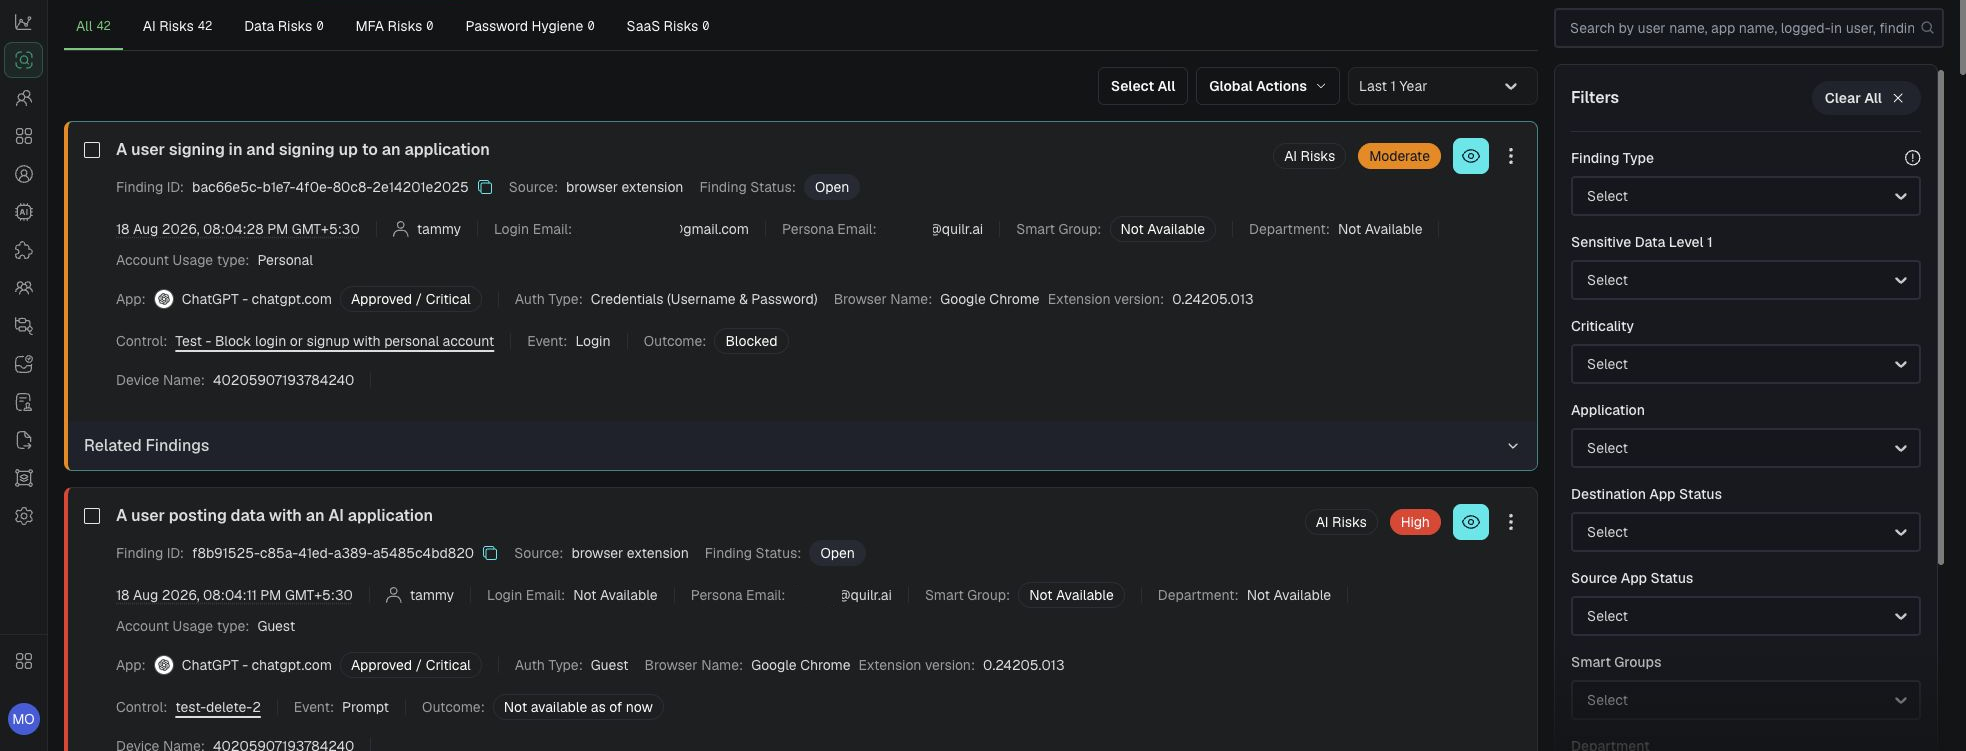
Browser finding card and filters.
Example: personal sign-in blocked
The inspected tenant contained a Browser Extension finding for a user signing in or signing up to an application. The card showed Browser Extension source, Open status, AI Risks, Moderate criticality, ChatGPT, personal account usage, credential authentication, Chrome, a login-control name, login event, and Blocked outcome.
-
Confirm identity and timing against the test/incident record.
-
Compare the application’s approval/criticality with policy intent.
-
Check that a Blocked outcome is consistent with the named control and current mode.
-
Compare extension version and Last Seen if another device or user receives a different result.
-
Review Related Findings and record one of: expected validation, true violation, false positive, or needs escalation.
Expected result: The investigator can explain why the control matched and why the response was or was not correct.
Verification: The case notes link finding ID, time, identity, application, policy, model/category, outcome, client version, related activity, and next owner.
Status, filters, and bulk handling
Use Open for work awaiting disposition, Acknowledged for activity accepted into an investigation workflow, and Resolved after the response and evidence are complete. The list supports filters including date, status, finding type, data category, criticality, AI asset or application context, group or department, action, and outcome where present. Search by identity, account, asset, or finding ID.
-
Select only findings that share a defensible disposition and owner.
-
Use the available bulk Acknowledge or Resolve action; avoid bulk resolution when evidence, user context, or control outcome differs.
-
Open Related Findings before disposition to identify recurrence across the same user, account, AI asset, control, or time window.
-
Record the rationale, response owner, linked ticket, and validation evidence outside the console when the finding view does not provide those fields.
Follow the end-to-end investigation workflow to connect a finding with its identity, asset, policy, model, and audit evidence.