Connect Your AI App
You run one command, approve your computer in the browser, and your permitted local tools appear in your AI app. You do this once per computer, not once per MCP.
Walk through it
Running the connection command, approving your computer in the browser, restarting your client, and calling a local tool.
Or step through it below.
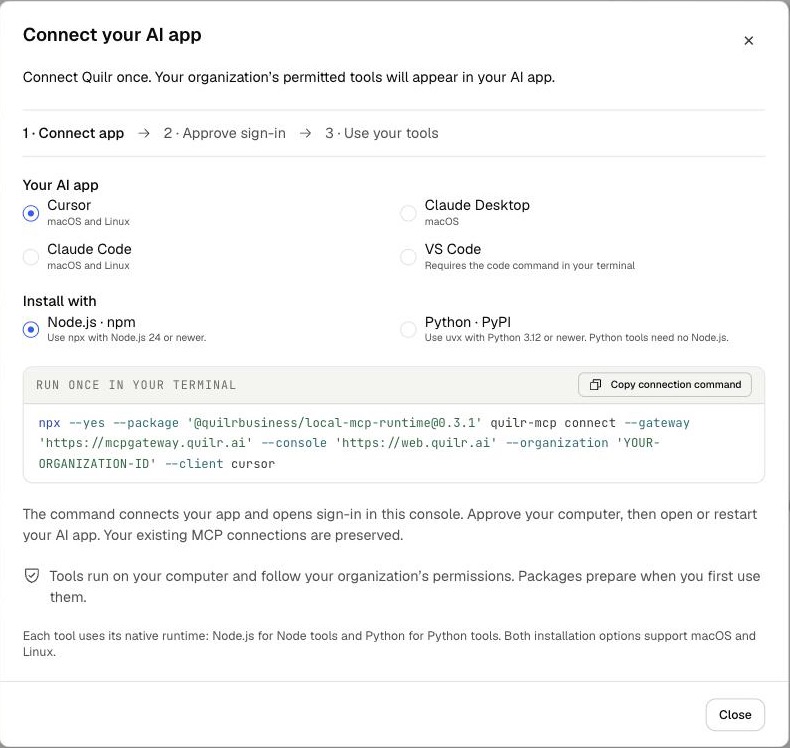
Choose your AI app and how to install
Open Self service -> Your local tools -> Connect your AI app. Pick Cursor, Claude Desktop, Claude Code or VS Code, then choose Node.js with npm or Python with PyPI.
npx --yes --package '@quilrbusiness/local-mcp-runtime@0.3.0' quilr-mcp connect \
  --gateway 'https://mcpgateway.quilr.ai' \
  --console 'https://web.quilr.ai' \
  --organization 'YOUR-ORGANIZATION-ID' \
  --client cursor
Always use Copy connection command in your own dialog. The command carries your organization identifier and a pinned version, so a colleague's command will not be right for you.
Before you start
- macOS or Linux
- Node 24+ for the npm connector, or Python 3.12+ with uvx for the PyPI connector
- Network access to your gateway
- An eligible organization account
Python MCPs can run through the Python connector without Node. Each MCP still needs its own native runtime. VS Code users also need the code command available in the terminal.
1. Open the connection dialog
Open the setup link your administrator sent you, or go to Self service -> Your local tools -> Connect your AI app. The dialog runs three steps: Connect app, Approve sign-in, Use your tools.
Under Your AI app, choose your client:
Under Install with, choose Node.js · npm (npx, Node.js 24 or newer) or Python · PyPI (uvx, Python 3.12 or newer). Python tools need no Node.js. The Python option appears when your operator has enabled a published Python release.
2. Run the single command
The dialog shows a Run once in your terminal panel with a Copy connection command button. Use that button.
The command is pinned to your organization's approved connector version and carries your own organization identifier, so copy it from your own dialog rather than from memory, from a colleague, or from this page.
That command:
- Installs a private, versioned connector
- Preserves your existing MCP entries
- Registers one Quilr connection for this organization
- Opens browser sign-in
It does not depend on a temporary npm or uvx cache after setup.
For any other stdio client, the same command with --client other prints a stable mcpServers entry you can paste in yourself. This is an advanced path; the supported clients above need no JSON edit.
Teams using pipx can install the same pinned Python package and run quilr-mcp connect with the displayed flags.
3. Approve your computer
Sign in with your own organization account. The connection code is filled in automatically.
Check that the requesting computer shown is yours, then select Connect computer. Approve only a connection you started.
A code expires after ten minutes. If sign-in is canceled, rerun the same connection command; completed configuration is preserved. For browsers that cannot receive the automatic handoff, Enter connection code remains available.
4. Open your tools
Return to your terminal or AI app. Open or restart the app, and approve its native MCP trust prompt if it shows one.
Choose View my local tools after approval. Self service then shows your linked computer and a starter prompt for your AI app. This link stays visible when you reload the page.
It confirms enrollment, not that your AI app is currently running.
If no tools are permitted, ask your administrator to grant access, then use Refresh access. Do not sign in again.
5. Use a tool
Ask your AI app to use a permitted tool. For the Python Echo example, ask:
Use Python Echo to return "Hello from my computer".
The first call may return Preparing while your computer sets the package up. This happens once per package.
A Preparing response means the tool did not execute. Ask the app to check quilr_connection_status, then retry when it reports ready.
Later calls are fast, because the package is already set up.
Connection states
Installed or Verified installation in General is a historical report. It is not proof that your AI app is still connected.
Signing in from inside the AI app
If Quilr is not connected, your AI app can call quilr_connect, which opens the same browser approval flow. quilr_connection_status reports progress.
The AI never receives the connector credential, and no password is ever pasted into chat. The initial client registration described above is still required before either tool exists.
Third-party provider sign-in
Signing in to a third-party provider is separate from connecting to Quilr. An approved MCP can ask you to sign in at an approved web address; depending on your AI client, that arrives either as a prompt or as a sign-in link. You are never asked to type a provider password into the chat.
After you finish a provider sign-in, check the operation before retrying it. Actions that may have partly completed are not retried automatically.
Your local environment credentials stay on your machine. A desktop client launched from the dock may not inherit values set in your shell profile. Never paste secrets into chat.
Choosing a workspace or interpreter
- Add
--python /absolute/path/to/python3to select an interpreter when several Python versions exist. - Add
--workspace /absolute/projectto select a project root.
If your AI client already exposes a single project folder, that is used. Otherwise the connector works in its own private directory.
It scopes where the MCP works by convention, not by operating-system enforcement. If your package drives a browser, that browser must be installed separately.
Disconnecting
Disconnect before uninstalling. Package files remain under ~/.quilr-mcp after revocation. Remove that directory only after confirming no other installation uses it.
Advanced: managing a specific connection
The connection command prints its private connection state path. To diagnose or revoke that specific connection, run the same pinned npm invocation with:
quilr-mcp status --state PATH
quilr-mcp doctor --state PATH --package ID
quilr-mcp disconnect --state PATH
--stateWithout --state, these commands may act on a different connection than the one you set up, and report misleading results.