Salesforce
You can connect Salesforce to QuilrAI through two different MCP servers. Pick the one that matches what your agents need to do:
You can connect both at the same time. They show up as separate MCPs in QuilrAI, each with its own tools and access controls.
See Overview for shared prerequisites and secret-handling guidance.
Salesforce Hosted MCP
Salesforce runs its own MCP servers at api.salesforce.com. Access goes through OAuth 2.0 with PKCE against your org. Salesforce does not support Dynamic Client Registration, so you have to create an External Client App in your org. Its Consumer Key is the Client ID you give QuilrAI.
How Salesforce Hosted MCP Differs
- You create an External Client App, but a secret is not required. PKCE protects the authorization. Turn off the Web Server Flow and Refresh Token Flow secret requirements, and QuilrAI only needs the Consumer Key.
- JWT-based access tokens are mandatory. The hosted MCP servers only accept JWT access tokens. This setting is off by default and easy to miss. With it off, authorization appears to work, but every MCP call is rejected. See Configure Security Settings.
- Each server has to be activated first. Salesforce ships several standard servers (read-only, create and update, delete, all). None of them respond until an admin activates them in your org.
- Access follows the authorizing user. Tools run with the Salesforce user's own profile, permission sets, and sharing rules.
Connection Details
1. Activate A Hosted MCP Server
- In Salesforce, open Setup.
- In Quick Find, search for MCP Servers and open it.
- Open the API Catalog (the list of Salesforce-provided servers) and click Activate for each server you want to use.
- Open the activated server. On the Details tab, copy the Server URL under Authentication Details.
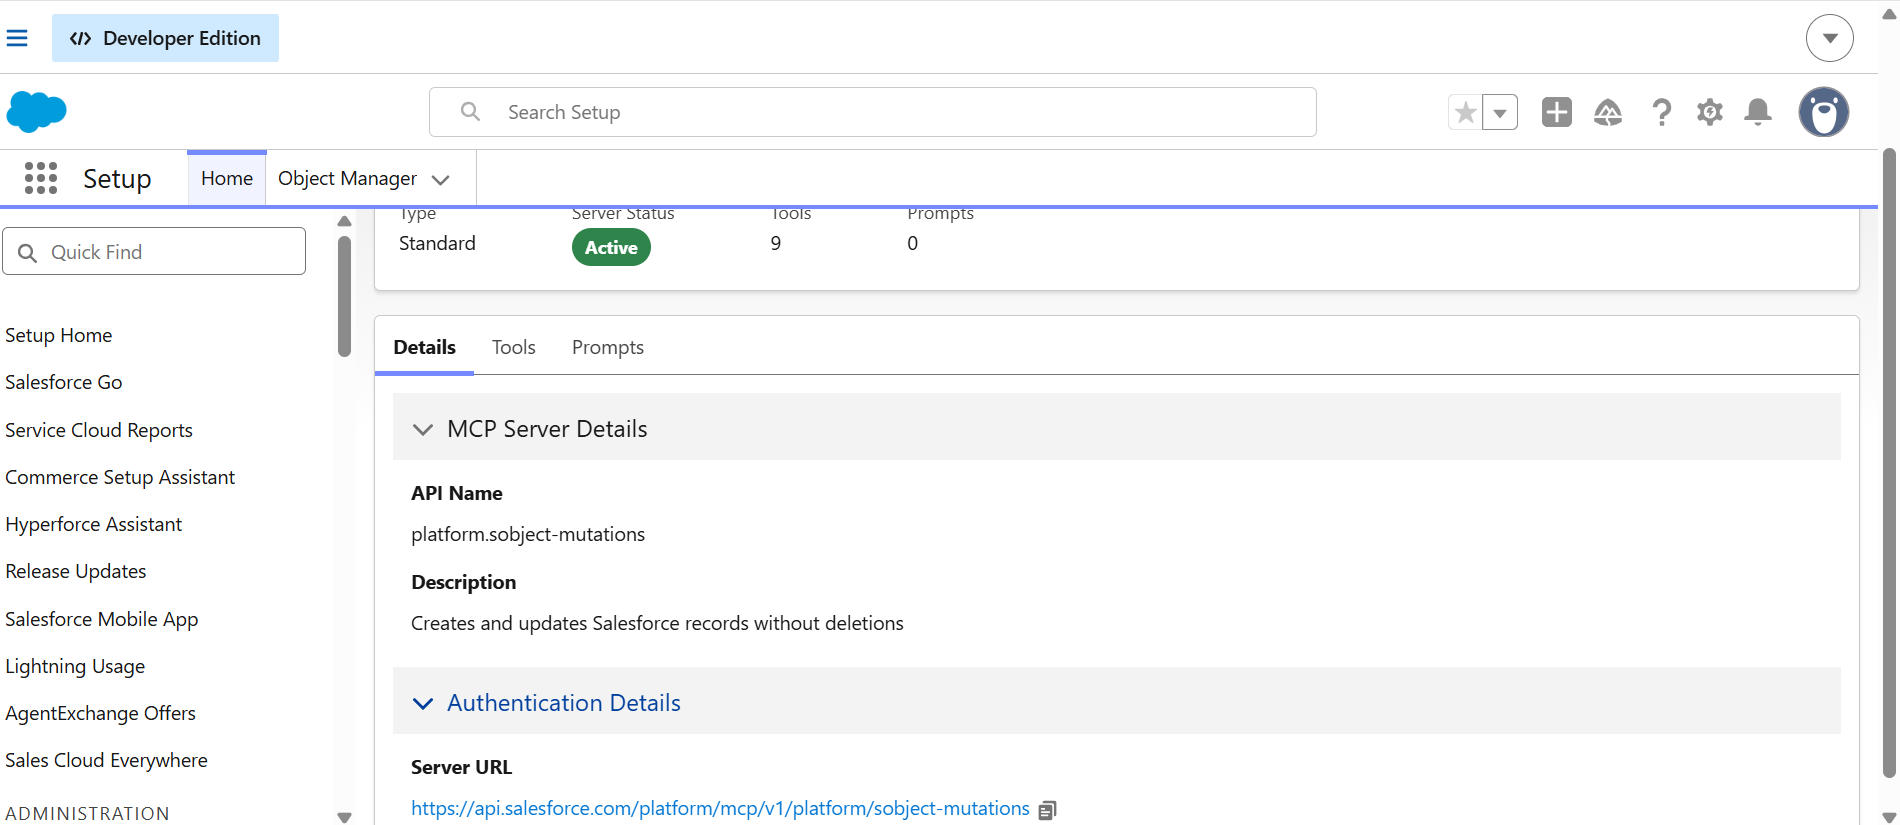
For a first test, start with SObject Reads (https://api.salesforce.com/platform/mcp/v1/platform/sobject-reads). It is read-only.
Standard MCP Servers
Always copy the exact URL from the server's Details tab rather than typing it by hand. Custom MCP servers you build in your org use https://api.salesforce.com/platform/mcp/v1/custom/<API_NAME>.
For sandbox and scratch orgs, the path includes /sandbox/, for example https://api.salesforce.com/platform/mcp/v1/sandbox/platform/sobject-reads. The server Details tab in the sandbox shows the correct URL.
Connect SObject Reads or SObject Mutations rather than SObject All unless agents really need to delete records. Picking a smaller server limits what an agent can do before any QuilrAI policy applies.
2. Create The External Client App
- In Setup, search for External Client App Manager and open it.
- Click New External Client App.
- Enter the basic information:
- External Client App Name: any name you choose, for example
Quilr Salesforce MCP - API Name: fills in automatically
- Contact Email: an admin mailbox for your team
- Distribution State: Local
- External Client App Name: any name you choose, for example
- Expand API (Enable OAuth Settings) and check Enable OAuth.
3. Configure OAuth Settings
- Set Callback URL to the QuilrAI callback URL exactly as QuilrAI shows it. Production is
https://mcpgateway.quilrai.com/oauth/callback. - Under OAuth Scopes, move these two scopes to Selected OAuth Scopes:
- Perform requests at any time (refresh_token, offline_access)
- Access Salesforce hosted MCP servers (mcp_api)
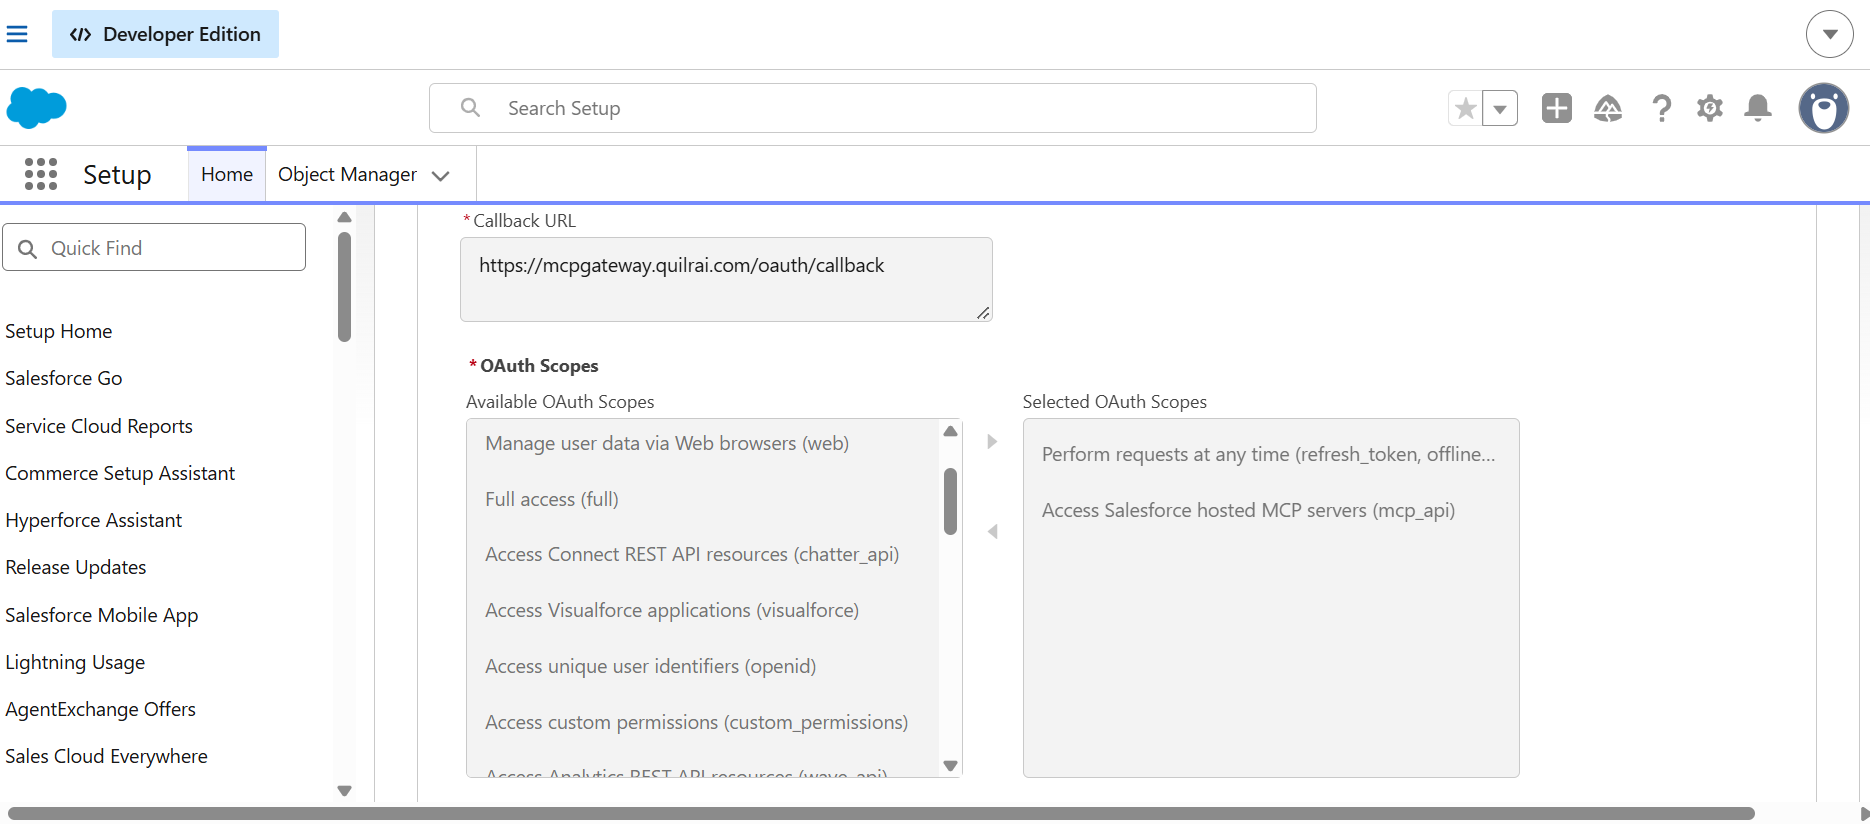
Do not add the general api or full scopes. The hosted MCP servers only need mcp_api.
4. Configure Security Settings
In the Security section of the same OAuth settings:
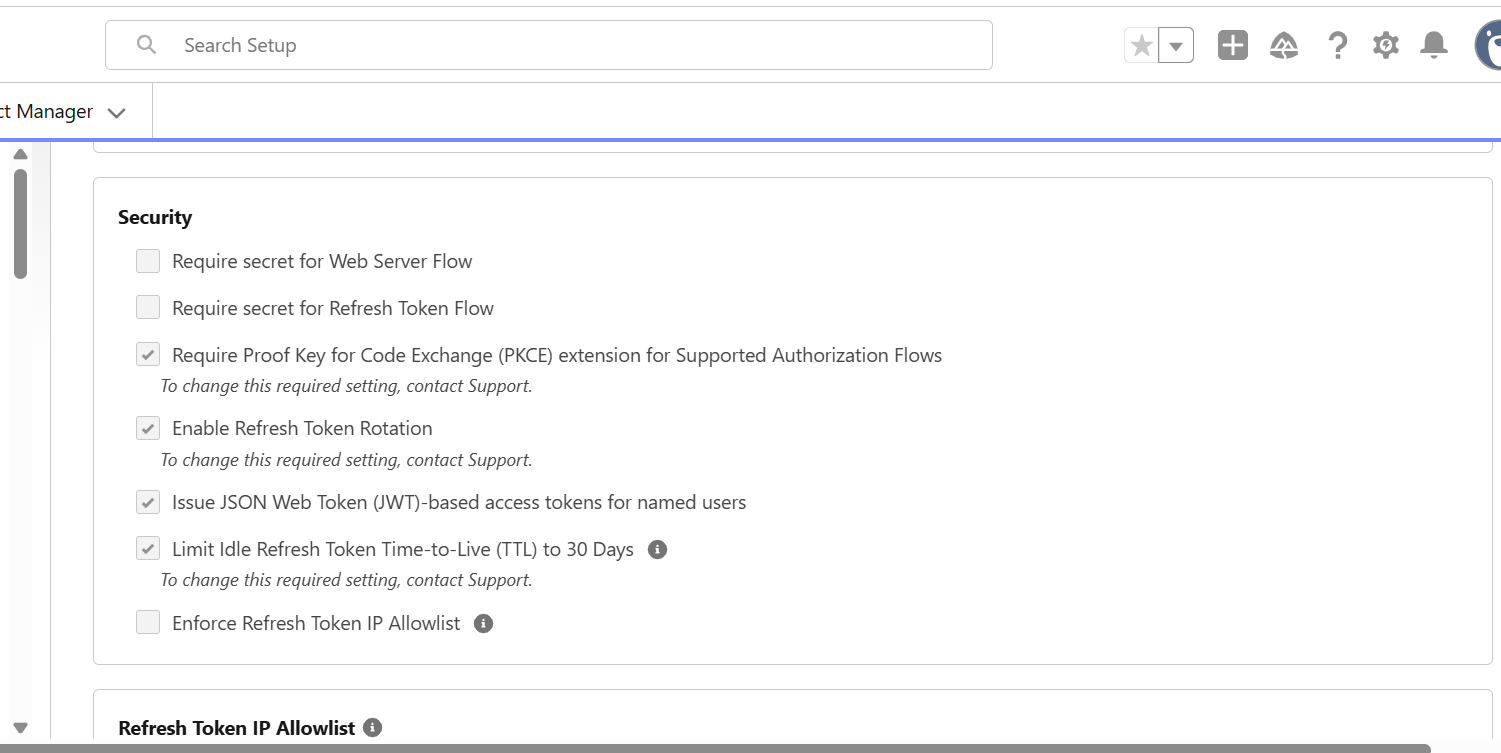
Issue JSON Web Token (JWT)-based access tokens for named users is the setting people miss most often. Without it, Salesforce issues opaque access tokens that the hosted MCP servers reject. The OAuth consent screen still completes, but the connection fails or returns no tools.
In some orgs, Salesforce enforces PKCE, Refresh Token Rotation, and the 30-day idle refresh token limit and shows them as locked ("To change this required setting, contact Support"). Leave them on.
Click Create. Salesforce can take a few minutes to roll out a new External Client App, so wait before you authorize.
5. Copy The Consumer Key
- In External Client App Manager, open the app you created.
- Open the Settings tab and expand OAuth Settings.
- Click Consumer Key and Secret. Salesforce may send a verification code to your email first.
- Copy the Consumer Key. You only need the Consumer Secret if you left a secret requirement turned on in step 4.
6. Add Salesforce Hosted MCP To QuilrAI
- In QuilrAI, go to MCP Gateway and click Add MCP.
- Paste the server URL you copied in step 1, for example
https://api.salesforce.com/platform/mcp/v1/platform/sobject-reads. - Set Auth Mode to Auto-detect.
- Paste the Consumer Key as the Client ID. Leave Client Secret empty unless you kept a secret requirement on.
- Click Create. The Salesforce login and consent screen opens. Sign in as the user whose permissions the agent should use, then click Allow.
- After authorization, QuilrAI connects and fetches the available tools.
Give your MCP clients the QuilrAI gateway URL shown on the MCP card, not the api.salesforce.com URL, so traffic goes through the gateway's controls.
To connect a second Salesforce server, such as SObject Mutations, repeat step 6 with its URL. You can reuse the same External Client App.
Cirra AI Salesforce Admin MCP
Cirra AI is a third-party MCP server built for Salesforce administration. Salesforce Hosted MCP is a direct connection to Salesforce and works on record data. Cirra AI sits between QuilrAI and your org and works on org configuration: custom objects and fields, page layouts and record types, profiles and permission sets, user setup, flows and validation rules, SOQL, and Tooling API operations.
It is available in the QuilrAI MCP Library as Cirra (Salesforce MCP).
How Cirra AI Differs
- No Salesforce setup. You do not activate MCP servers or create an External Client App. Cirra AI supports Dynamic Client Registration, so QuilrAI registers itself automatically through OAuth Connect.
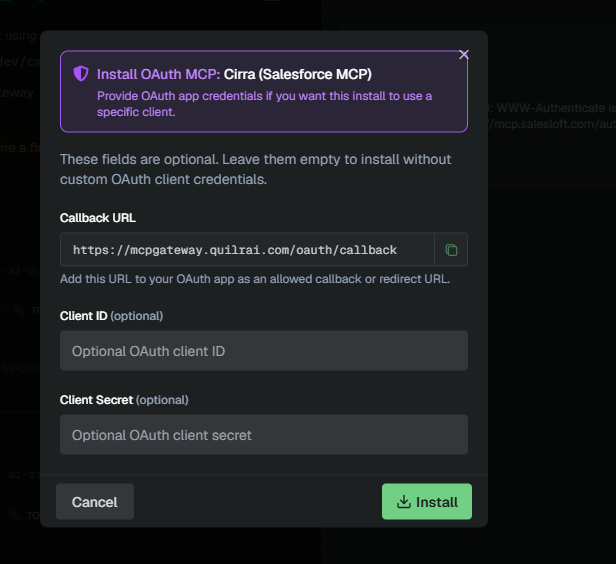
- Client ID and Client Secret are optional. The install dialog has these fields, but you can leave them empty. Fill them in only if your organization has its own OAuth client that it wants this install to use.
- You sign in with your Salesforce account. During install, the flow redirects to Salesforce. The Salesforce account you sign in with decides which org Cirra AI connects to and which permissions its tools have.
- Admin-level impact. Tools can change metadata, permissions, and users in the connected org, so a wrong call affects the whole org, not a single record. Treat this MCP as high risk.
- Metered usage. Cirra AI charges tool calls against the credits on your Cirra AI plan.
Connection Details
Install Cirra AI From The MCP Library
-
In QuilrAI, go to MCP Gateway and open the MCP Library.
-
Find Cirra (Salesforce MCP) and click Install.
-
The Install OAuth MCP dialog opens. Leave Client ID and Client Secret empty to install without custom OAuth client credentials.
-
Click Install. The flow redirects to Salesforce.
-
Sign in with the Salesforce account whose org and permissions the agent should use (normally a System Administrator for admin work), then approve access.
-
After authorization, QuilrAI connects and fetches the available tools.
If you do fill in Client ID and Client Secret, add the Callback URL shown in the dialog to that OAuth app as an allowed redirect URL first. Otherwise the redirect fails with redirect_uri_mismatch.
Sign in with a sandbox user for your first install and test agent workflows there before you connect production. Every Cirra AI tool call runs with the permissions of the Salesforce user who signed in.
Lock Down Admin Tools
Before you roll Cirra AI out to agents, use QuilrAI controls to narrow what it can do:
- Tools Management - turn off tools the agents do not need, such as user creation or permission-set assignment.
- Access Control - limit which users and agents can reach this MCP.
- Security Guardrails - add checks on write and metadata operations.